ID does indicate which is the latest or oldest and which configuration represents the specific ID - duh.
# Presets
todo
Presets are a great way to reduce the workload for everyone involved with managing Materials, like explained in the Briefing Forms Feature Guide.
To make everyone happy and enable the usage of the feature, you need to do but a few things first.
Philosophies
Presets are locked Materials, which means that they are not editable anymore, after you promoted
them to being such.
So, if you want to change something, you first need to unlock them.
You might now ask yourself the more futuristic question about "But what if I already have some Materials in use that
are based on one Preset later on?", do not be afraid - we got your back 💪
Every Material that was created and is based on a Preset will not be affected by you unlocking that
Preset and therefore downgrading it back to a Material to change its specs - so it's not an issue.
After you have changed what you wanted to change you can then simply lock your Material and start using it again, just like before, as a Preset.
TIP
Yes, this also does not change already created Materials that where previously created, they stay completely untouched 😉
# Requirements
Firstly, to use Presets your User needs to have the Permission for
manageAllPresetsset totrueso that the User can create Presets, to begin with, but every User should currently be able to see them as soon as they are created within your Content App. By default we currently only give ADMIN User Roles the correct right for use.To make Materials eligible to be locked and promoted to a Preset you then need to set up a Preset Configuration inside SC Manager which then needs to match with the Materials properties.
# Back End
So then, let's dash into your next SC Manager adventure.
As already said one of the requirements to get Presets working within your Content App is to
generate some Preset Configurations there.
So, without further ado, let's jump right into it - if you have already worked with the Configurations
within your Content App this will mostly be nothing new as we try to utilize the same workflows wherever possible.
# Overview

Within SC Manager we do have a specific area for setting up Preset Configurations.
IDLabelLabel is your human-readable identifier for what the specific configuration entails.
TIP
If you want to get the most out of this you might want to consider using a naming scheme for all of them in reagards
of what's most important to you - but please be aware of how painstaking it can be if you have to change multiple
hundreds of them by hand.
Make the most of it.
MaterialsSo, Materials should be easily the second most important to you, in the use case of when you are changing some
configurations.
This count indicates, how many Presets are connected to your current Preset Configuration. So think about what you want to change here, it might reflect on those related Presets that already exist.
Like with the App Configurations you can merge different copying strategies and modifier functions together and suit it to your liking, but this time the order of usage is currently dependent on the ID.
Let us now proceed to look into what to configure inside such a Preset Configuration.
# Create View
First we will take another deep dive.
For this one, let us say that every OPU does have the same fields and do
not differ from each other, in terms of field values (so that we can also make the most sense of our example).
We want to have the option of locking Materials for the OPUs Finland,
Norway, and Sweden, which we then want to be able to only use within Sweden.
While doing so, we want to have the field value for Product copied over.
After the process of creating a new Material from a Preset that matched our definitions above we then
want to manually grab the new one and want to set it's Status to Development Done so that the specific
Renditions are also triggered for the status change, within SCP.
TIP
The following JSON fields all do understand the general properties of a Material.
So, also be aware of the necessity to use JSON, where applicable - else use Arrays inside the JSON fields.
So, if you run into an error on saving, and you did build the wrong JSON or just used an Array, you know where to first search for any issues (looking at you, dear Developer/User 😄).
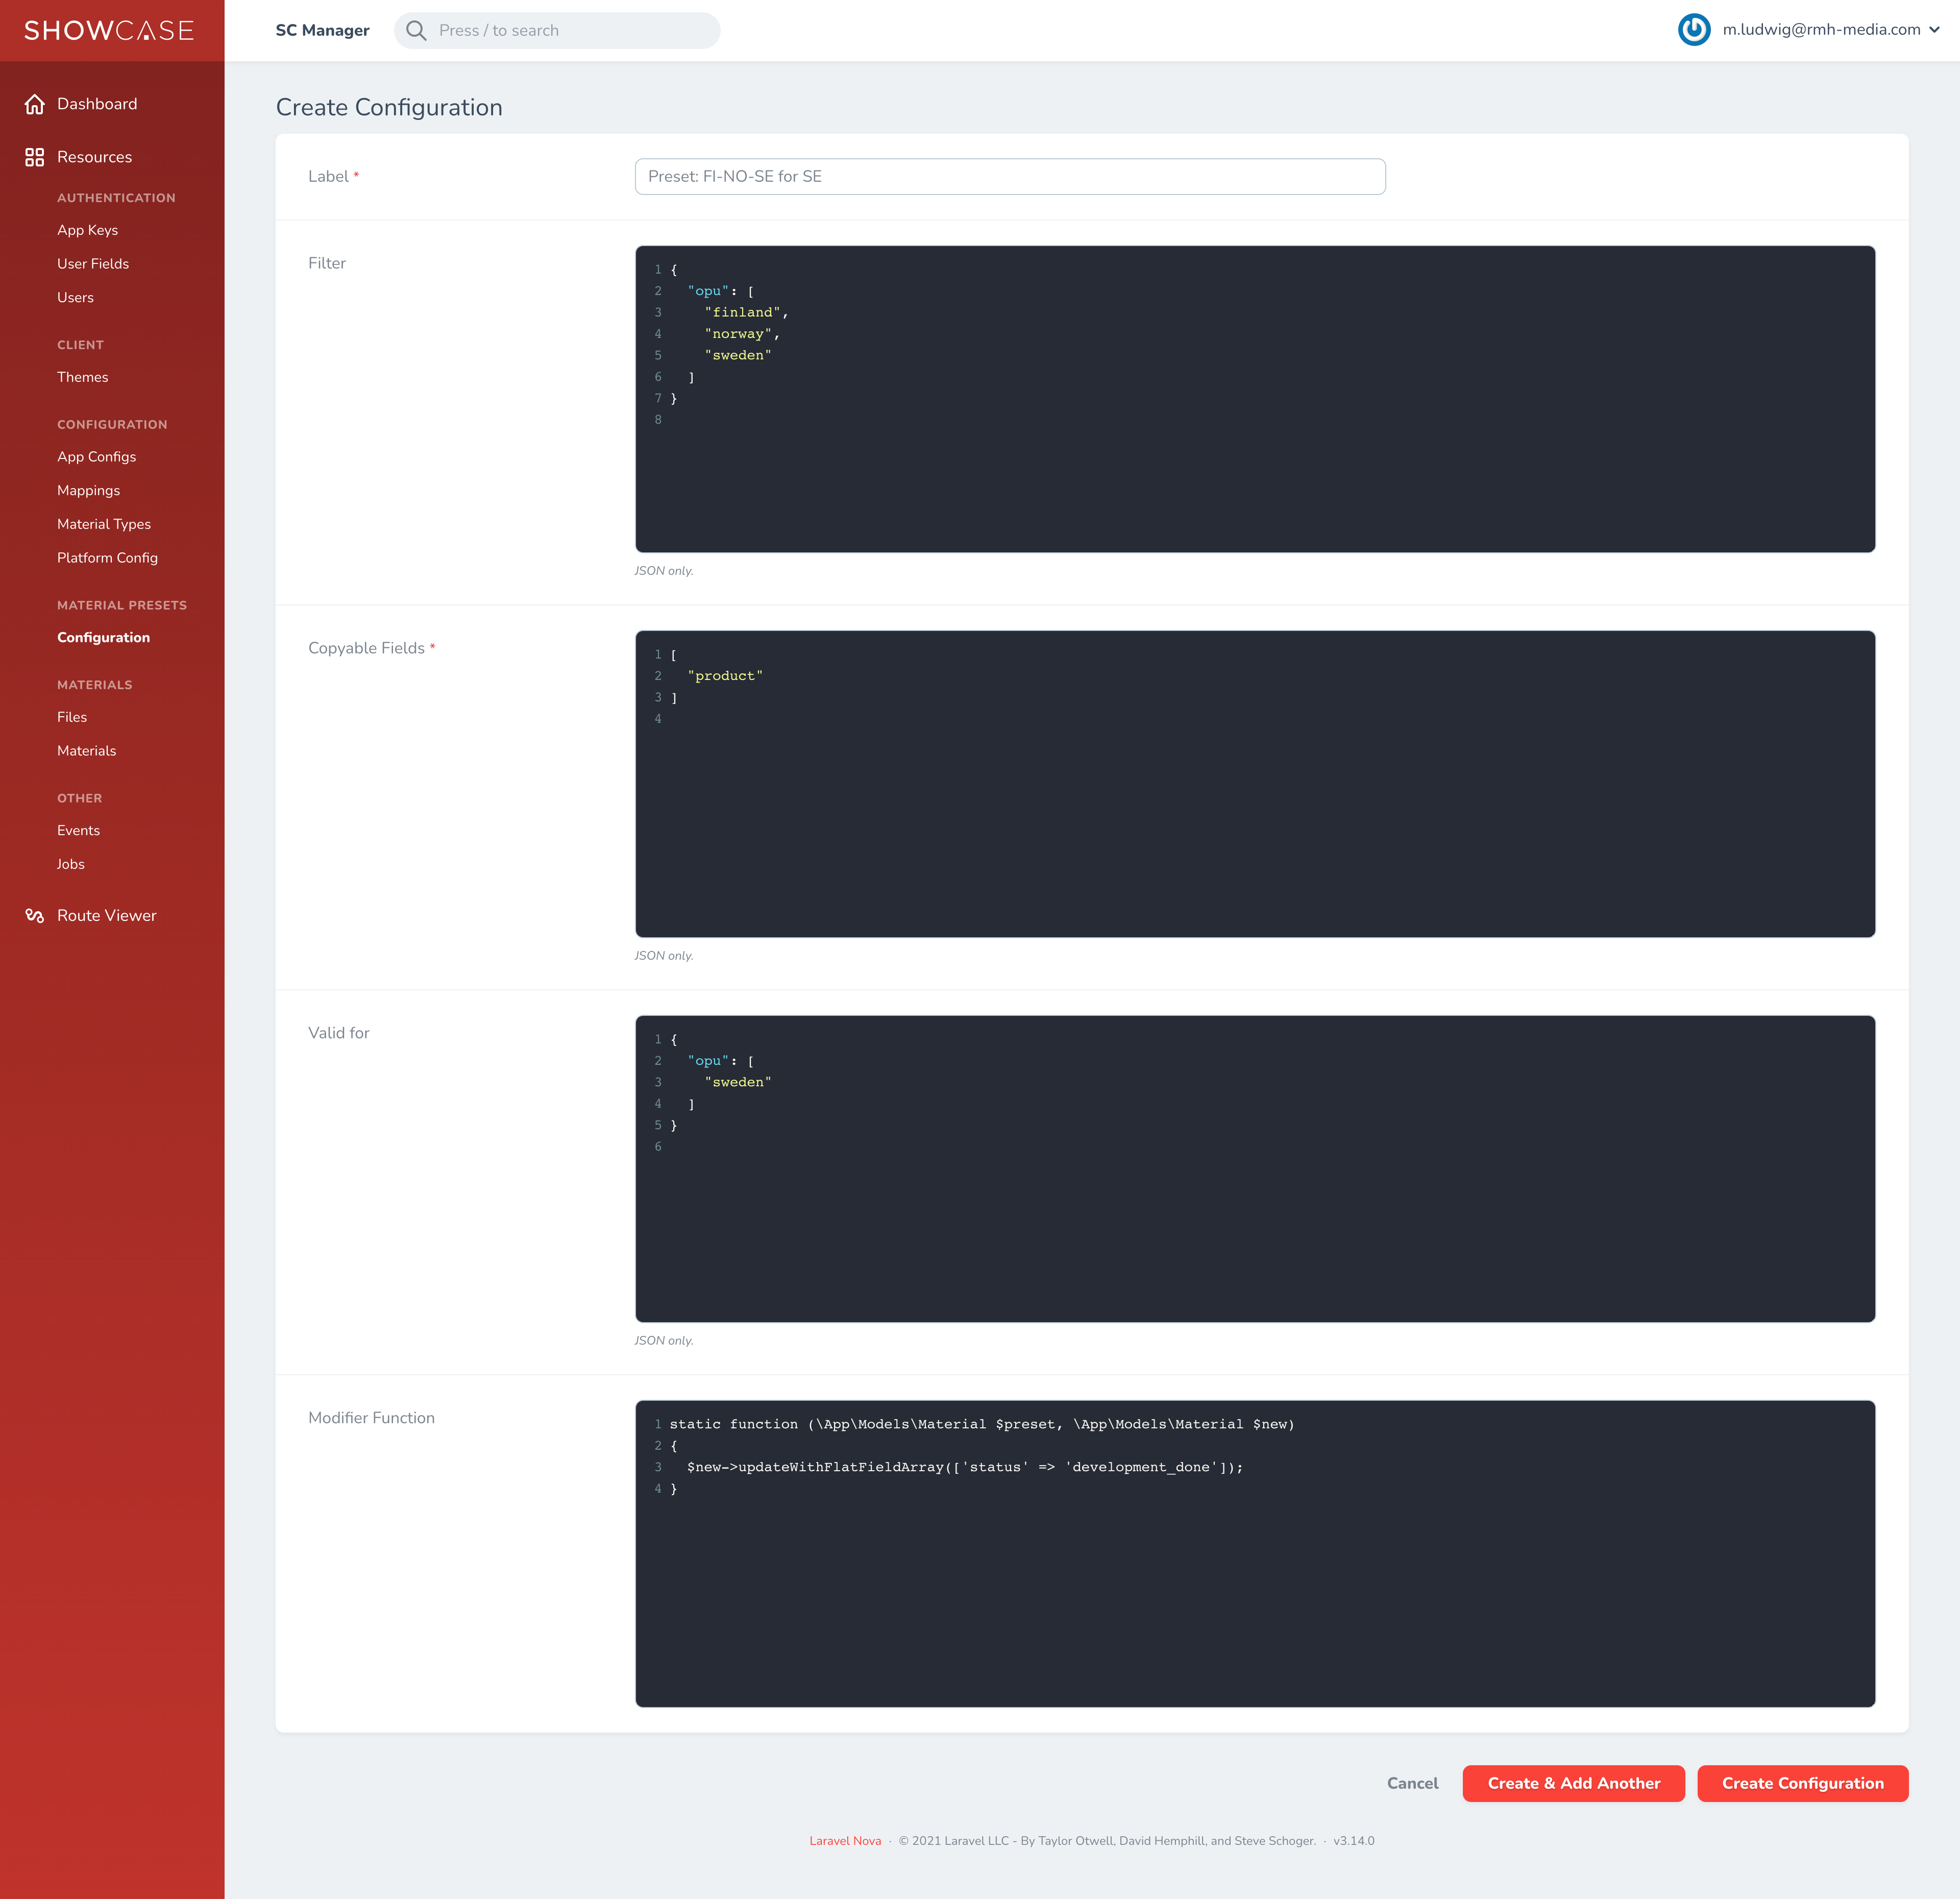
LabelAgain, Label is your human-readable identifier for what the specific configuration entails.
If you want to share your naming schemes with others please do so by networking - we are sure some people would be very glad to hear about your story.
Filter{
"opu": [
"finland",
"norway",
"sweden"
]
}
Like with every Filter field you know of SCP, you can filter here by e.g. materialType or opu.
A small example:
Copyable Fields[
"product"
]
With Copyable Fields you define what fields you want to be copied over from your Materials' properties.
Valid For{
"opu": [
"sweden"
]
}
You see, Valid For and Filter can be seen as distant or close relatives.
It depends on your strategies and use cases. Valid For reflects, in e.g. which OPUs any Preset
created via this specific Preset Configuration is available for usage:
Modifier Functionstatic function (\App\Models\Material $preset, \App\Models\Material $new)
{
$new->updateWithFlatFieldArray(['status' => 'development_done']);
}
Modifier Function is the most powerful option you get, as you can modify a callback that is executed after the
Preset is created yourself.
You can accept the newly created Material, and for example change its status directly to e.g. development_done,
so that the process to create the Renditions is triggered on save.
When you are ready for a first quick shot, let's check out if your config made is showing its signs on the Front End.
# Front End
After you logged into your Content App and have selected a Material that does match
your defined Filter within SC Manager, you should see some small changes within the UI:
# Locking A Material
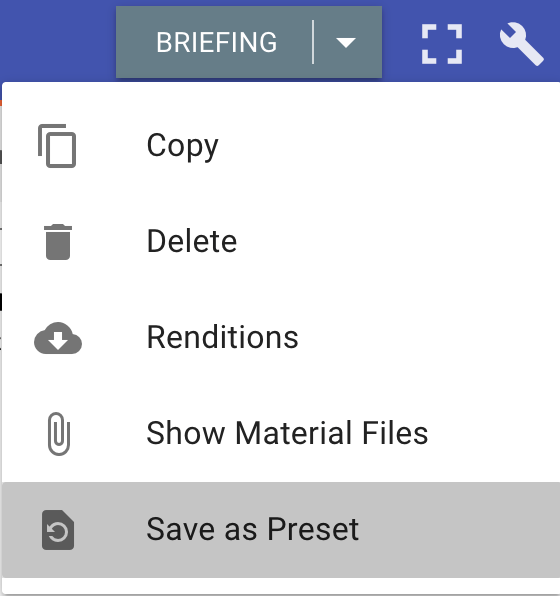
When matching you now have the option to select Save as Preset from your Action Menu. within the Status Bar of your selected Material, where you can also e.g. Copy a Material. Selecting the option will show you a dialog where you can proceed or abort the locking process.
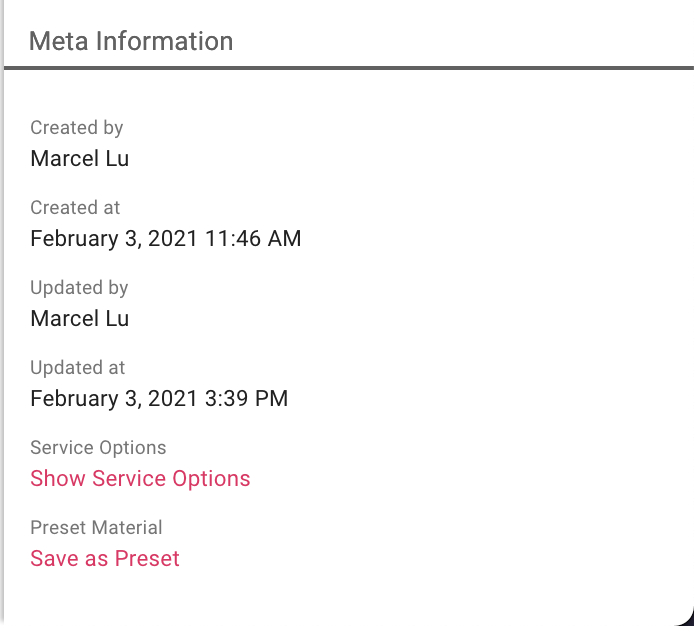
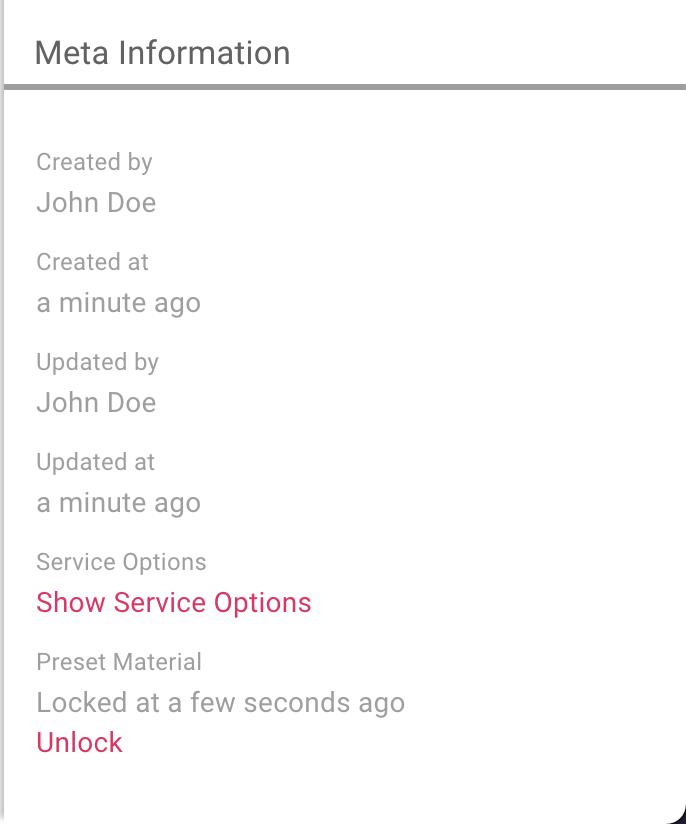
The same holds true for your Materials' Properties area. Down below, where you can find its listed Meta Data, you can now also see the interactive link for Preset Materials , Save as Preset, which also triggers the locking dialog.
# Unlocking A Material
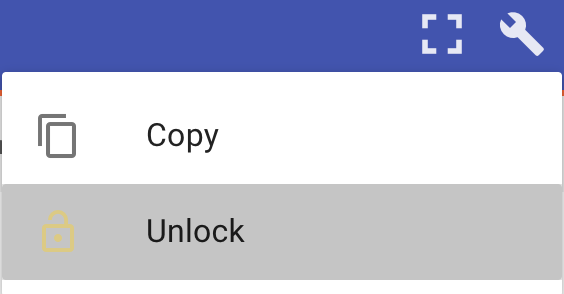
After you have successfully locked a Materials, you can then also unlock them again, without any other merits
than having them not selectable within the Material Type Selector.
Like we exaggerated to you in the Philosophies info box at the top, your already created Presets
are not changed in any way. You now get only an Unlock option within the Action Menu in the
Status Bar of your selected Material.
This will also trigger a dialog where you can proceed or abort with the unlocking process.
Basically the same holds true for the Meta Data within your Materials' Properties area.
Here the interactive link has also changed to Unlock and will also trigger the unlocking dialog.
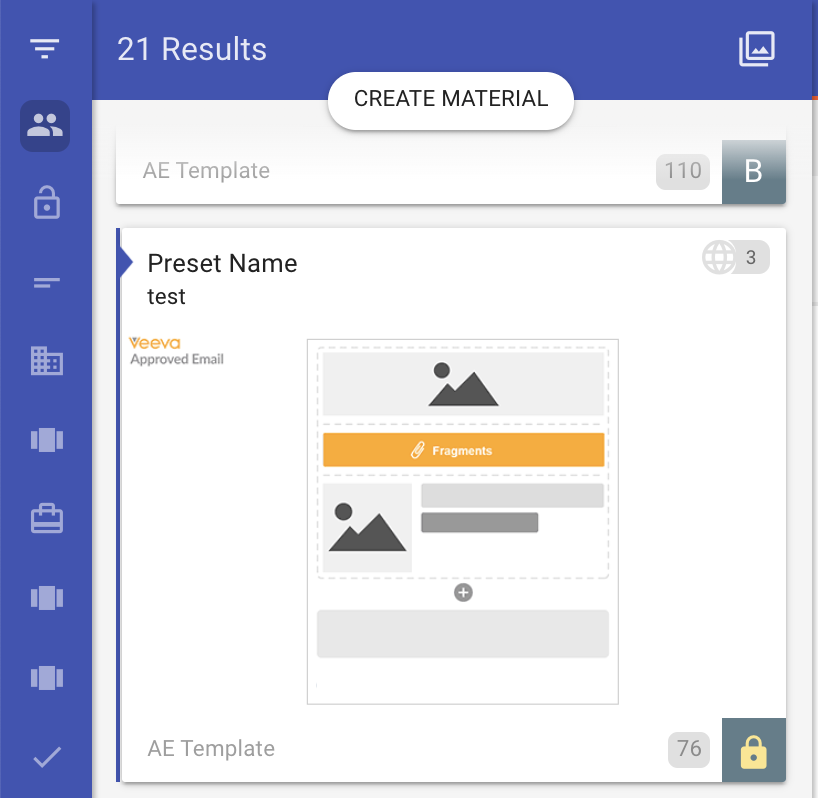
# Material Listing
After you have locked a Material this will also be reflected to the Material Selection inside your Content App, but only for locked Materials (Presets, right?):